


Roswell 88201's features:
-
Pentium 233mhz, 32 megs RAM
-
19" SVGA PC monitor
-
THREE interchangable control panels
(components by Happ
Controls) featuring trackball, spinner, and joysticks
-
Control panels protected by plexiglass
-
Interfaced via PowerRamp
PC Joystick
-
Customized marquee and wrap around cabinet
artwork
-
Protective kickplating around the bottom
-
Customized menu system
 The
Cabinet
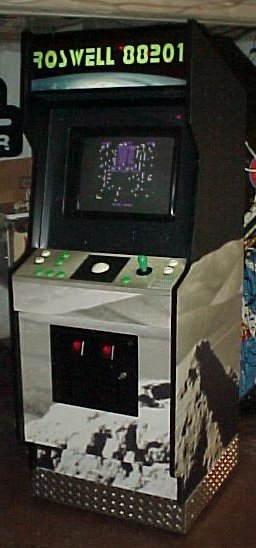
A large graphic of the moon's surface
completely wraps every inch of the cabinet, down to tiny stars on the monitor
bezel (see closeup of bezel bottom further below). Craig painstakingly
reproduced the moonscape from Hubbel Telescope pictures, painting every
square inch by hand. Well, actually he admits somewhat sheepishly
that it's wallpaper
($99). :) The base of the cabinet is fitted with custom-made aluminum
diamond kick plates for protection. I personally really appreciate
the simplified color scheme for his control panel - I think it gives it
a look of class.
 The
Marquee

Craig made the marquee on his computer
using Paint Shop Pro 5. It was printed on photo quality paper at
a local print shop. The cost of printing was approximately $50.00
because he had to have two copies made. One is left as is, the second
one he cut out the Roswell lettering and the earthrise, leaving nothing
but the black behind. Then he applied it to the back of the picture.
In other words, the black is doubly thick, the letters and earth rise singly
thick. This ensures that when the marquee is illuminated, the black
is dead black and the neon green lettering and the earthrise glow brightly.
The marquee was then sandwiched between two pieces of plexiglass.
Click on the marquee to get the original graphic he took to the printer.
 The
Control Panels
The machine has not one but three
interchangeable control panels. Craig chose to utilize this design
because he did not feel there was a singular control panel layout that
"correctly" encompasses all of the 330 games on his machine. As you
look at the pictures, notice how well laid out and playable the controls
appear.
Original
Control Panel
.jpg)
.jpg)
Click
for larger views
The first (Main) control panel is
based on two joysticks. Craig based the design of this panel around the
game "Defender"
because it had the most buttons. The ergonomic design of this panel very
comfortably works with approximately 90% of the games on the machine. Compare
this to Dale's graphic of the original
Defender control panel. Notice the connector.
.jpg)
.jpg)
Click
for larger views
The Second panel is designed around
a track ball and was based on "Missile
Command".
.jpg)
.jpg)
2.jpg)
Click
for larger views
The third panel is designed around
a spinner control and was based on "Tron".
Spinner by TwistyGrip.
Inside
the Control Panel
Click
for a larger view
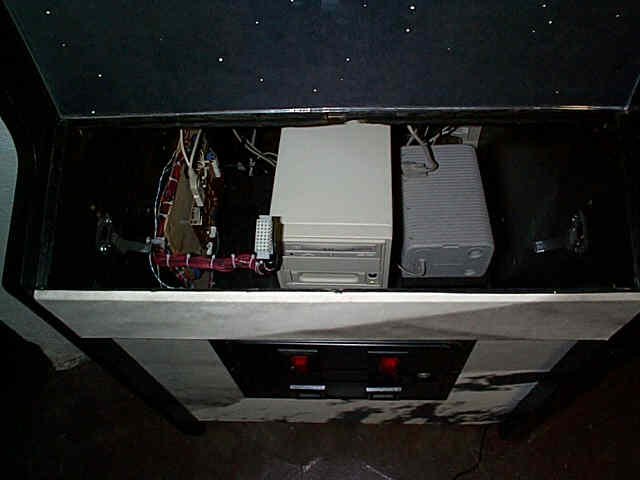
Each panel has a wiring harness that
ends with a 36 pin Molex connector (A molex connector is a molded plastic
multiple-pin connector used for quick connection/release in arcade games).
Swapping of the control panels takes less than a minute and is very
easy to accomplish. The panels can be swapped on the fly with no re-booting
needed. All arcade buttons, joysticks and trackball are from Happ
Controls. The control panels are finished with Plexiglas to protect
the control panel overlay.
Did you notice
the sticker on the bottom right of each control panel? :)
 The
Interface
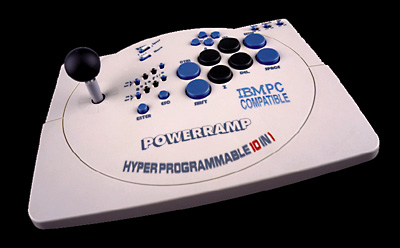
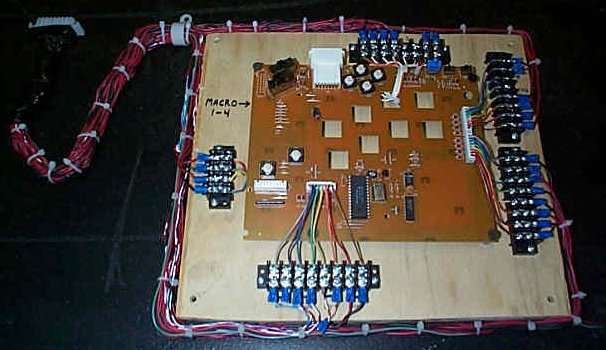
The controls are converted into keystrokes
by a circuit board pulled out of a PowerRamp
PC joystick ($39.99 retail). He chose the PowerRamp because it
has 4 macro settings which memorize 4 completely different sets of keyboard
configurations. This enables the machine to be used for MAME as well as
standard computer games (e.g. Duke Nukem, Quake etc.) all at the flick
of a switch. Notice the use of quick connector blocks (available
at Radio Shack among other places). In case Craig ever has to do
any re-wiring, all he'll need is a screwdriver, not a soldering iron.

Coining
Up
Click
for a larger view
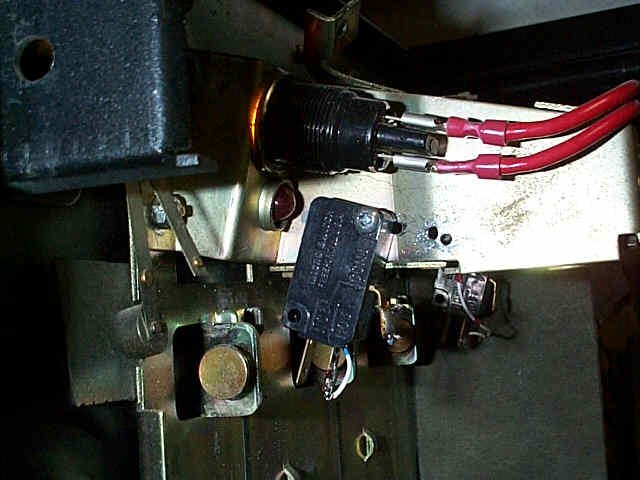
One of the nice touches Craig included
were microswitches inside the coin return slots. As he put it:
"The first time people use the machine they read the instructions and get
up to the point when the game requires credits and say "now what?"
I tell them to touch the quarter slots. It always get a great reaction."
A lot of people have been talking about doing exactly this in their own
projects.

Inside
the Cabinet
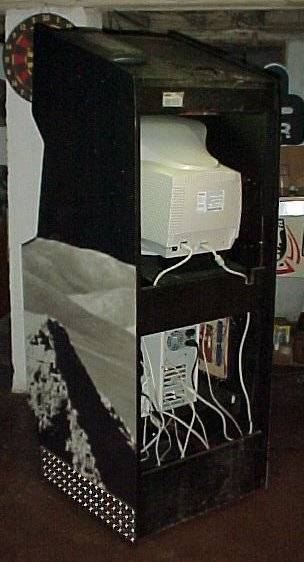
Here's the rest of the details...
-
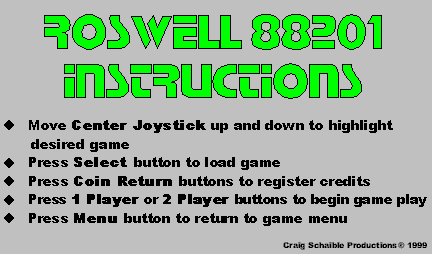
Craig's cabinet is controlled by a custom
menu being programmed using Visual Basic with an HTML backdrop. It's
not ready for prime time yet. The way it works, however, is slick.
To play the machine the user simply toggles to their game of choice by
tapping the center joystick up or down. Once the desired game is highlighted,
they press the "Select" button to load the game. If the player decides
at any time to change games all they need do is press the "Menu" button
and the game menu returns. A friend of his is developing the custom
front end specifically for this machine. When complete, sensors will be
mounted to each of the control panels. When each panel is mounted to the
machine, only the games that apply to that panel will appear in the menu.
A photo of the control panel will appear on the screen. The controls in
the photo will be labeled (left, right, fire etc.) As the player toggles
through the list of games, the labels under the controls will change to
match the game selected. Definitely slick!
 Craig has since sent me a picture
of the front end in action. Some of the features include being able
to quickly scroll through the list of games via joystick - push left/right
to skip by letter (6 clicks to the right and you're at the "F" games),
high-speed scroll after holding joystick up/down for 3 seconds, proper
Windows 98 shutdown via the menu & player 1 button. Very cool
:)
-
There is a pair of amplified speakers
in the header which includes volume control as well as a headphone jack
for private play. Inside the cabinet is a subwoofer (which you can see
"Inside The Control Panel" above) with an external switch. When activated
it shakes the whole box.
-
One thing about the cabinet is the lack
of T-mouldings. Craig stripped off all of the mouldings, filled the
grooves and laminated all the edges. The end result is a sophisticated
furniture-like feel that is different from the other cabinets he owns.
-
The bottom of the box has two twin nylon
rollers in the back with nylon feet in the front. It can be moved quite
easily by one person yet does not budge during gameplay.
-
The computer is controlled by a wireless
keyboard with a hidden infrared sensor. There is also a hidden control
that is mapped to the "Tab" key for keyless configurations of the games.
Craig says the project took him
4 months. I think it was worth the effort! :) Craig has let
me post his email address in case
anyone wants to talk to him about it. Thanks Craig!
--
Home --


![]()
![]() Added information and a screen shot of the Roswell frontend. Looks
good :)
Added information and a screen shot of the Roswell frontend. Looks
good :)
.jpg)
.jpg)
.jpg)
.jpg)
.jpg)


![]()

![]()

![]() Craig has since sent me a picture
of the front end in action. Some of the features include being able
to quickly scroll through the list of games via joystick - push left/right
to skip by letter (6 clicks to the right and you're at the "F" games),
high-speed scroll after holding joystick up/down for 3 seconds, proper
Windows 98 shutdown via the menu & player 1 button. Very cool
:)
Craig has since sent me a picture
of the front end in action. Some of the features include being able
to quickly scroll through the list of games via joystick - push left/right
to skip by letter (6 clicks to the right and you're at the "F" games),
high-speed scroll after holding joystick up/down for 3 seconds, proper
Windows 98 shutdown via the menu & player 1 button. Very cool
:)