Extraído de Emulatronia (http://www.emulatronia.com)
Last Updated (28 OCTOBER 99)
Translated to English by Dennis Joslin 12 Nov 00
The original Spanish page resides here.This is the second project that we have prepared for you. In this artice, it adapts the wonderful pad of the Nintendo 64 to the PC. This pad is wonderfully designed, mainly with respect to comfort since it fits perfectly in the hand. Only problem that we can find with the pad is the directional control (analog or digital), because of design isues (not of drivers, but of pad) it is not possible to be comfortable using both at the same time.
The credit of being able to make this wonder must go to Stephan Hans (home) because, thanks to him, we can make it, he designed the circuit. And we must also be thankful to Earle F.P. III for the driver DirectPad, since if it weren't for him we would not be able to use the pad in DirectX games. I insist that the people in responsible for this ability are the mentioned people, and that I have not designed the circuit nor driver, I have only prepared this instructional article to facilitate the assembly of the interface.
Before beginning with all the components of the assembly, I must say that this circuit may be daunting to beginners. You may be discouraged by the complicated aspects in the circuit (in comparison with the PlayStation circuit), but if you have some slight knowledge and you feel that you have sufficient desire and patience, then continue.
One of the disadvantages of the present situation is that you are not going to be able to use the pad in MS-DOS, although seems that in a future we will be able to, thanks to excellent utility SNESKEY. We were satisfied with playing DirectX games with the great pad of the Nintendo 64.
It must also be noted, that in DirectPad, the Rumble Pack has yet to be implemented. We will have to check with Earle F.P. III to see if the next verion of DirectPad adds this feature..
You are not going to need a power supply, so you can breathe calm if you did not want to trash another one.
COMPONENT LISTING
Next, we have described the components that we are going to use. For ease of identification, I have made a small drawing of each component, to eliminate confusion.
COMPONENT 1
DRAWING
10 diodes 1N4148
COMPONENT 2
DRAWING
1 resistor 4,7 k 1/4 W or less (R1)
YELLOW-VIOLET-RED
COMPONENT 3
DRAWING
1 Resistor 100 k 1/4 W or less (R2)
BROWN-BLACK-YELLOW
COMPONENT 4
DRAWING
1 Resistor 10 k 1/4 W or less (R3)
BROWN-BLACK-ORANGE
COMPONENT 5
DRAWING
1 Resistor 2,2 k 1/4 W or less (R4)
RED-RED-RED
COMPONENT 6
DRAWING
1 ceramic capacitor 100 pF (C1)
COMPONENT 7
DRAWING
1 transistor PNP BC559 or 2N3906 (T1)
COMPONENT 8
DRAWING
2 CMOS 4006
COMPONENT 9
DRAWING
1 prototype board
COMPONENT 10
DRAWING
1 male DB-25 connector with cover
COMPONENT 11
DRAWING
1-2 meters of wire with 10 conductors
In addition to all this, obviously you will need a soldering iron, solder and a meter for the verifications.
DRAWINGS
If you have experience with PCB etching kits, I recommend to you that you use this otherlayout (Word 6 format) where you will find the circuit layout (7x3 cm.) Thanks to kike for the excellent document.
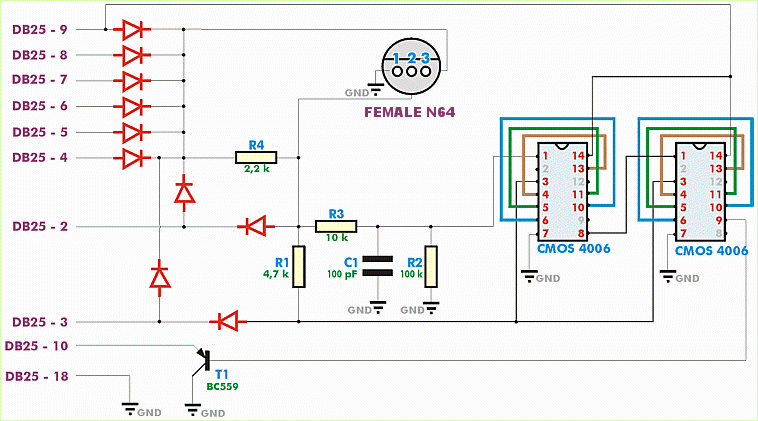
Schematic of the circuitIf you want to print a high-quality version of the schematics, get this .WMF
Circuit in WMF format (Windows metafile)
As you can see, the circuit is a bit more complicated than the PlayStation one. If you pay attention, the connections to the chips (4006) leave and then return to enter the same chip. They are of different colors simply to make it easier to see the individual lines. They do not mean anything else. Both chips have the same configuration of connections that leave and return to enter.
Please use maximum care when putting the transistor (T1) and the chips into circuit, since if you are mistaken, you may fry them.
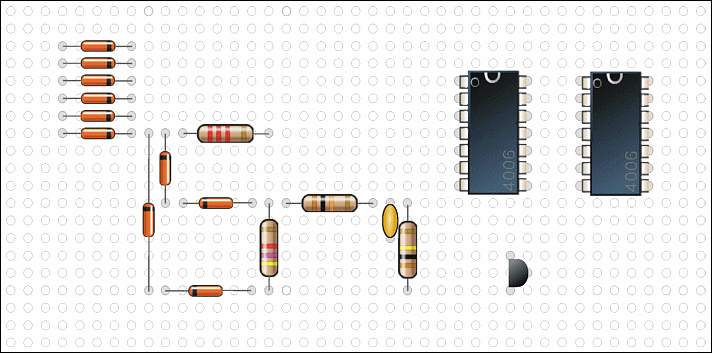
Aside from this, the greater complication of the circuit resides in being a little patient(?) to be able to make the connections under the experimental board. And following with my intention of making this as easy as possible, I drew out the graphical way or how I mounted the components, in case you need the guidance:
Assembly of the components on the prototype boardThe connections will be made on the underside. I recommend that you cut off a 6 inch piece of the 10 conductor cable so you will have wire to make the connections on the underside of the board when the component leads aren't long enough.
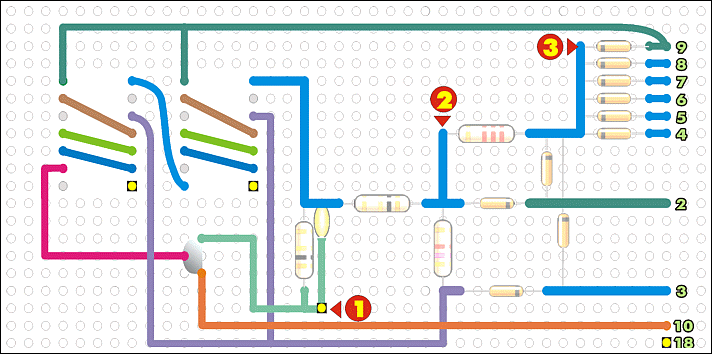
And now we see the connections, looking up from the under-side of the board. Take into account that this view is not the same one that the one of above, it is horizontal mirror supposing that the circuit board is transparent (I know, nobody has X-ray vision to see it in reality).
View of under-side of proto-board (with top side visible for reference)The purpose of the different colors in the drawing is, like always, to avoid confusion. Now, I'll explain some other things to you.
The green numbers on the right are the points where the 10 wires will connect to the pins on the DB-25. Solder in each one of the wires to the circuit board, then solder the other end on the male DB-25 connector as it corresponds to the drawing (according to the green number).
This symbol,
, corresponds to the ground. You should solder a wire in each one of these points and to take them all to the point where we will solder the wire corresponding to pin 18 of the DB-25.
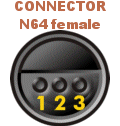
The yellow numbers in red circles correspond to the female connector of the Nintendo 64 controller. To the right is a picture of the female connector.
ASSEMBLY
If you do not have experience with a soldering iron I advise you to leave the soldering to someone more experienced. Otherwise, take your soldering iron and solder all connections as shown in the drawings.
DB-25 Connector
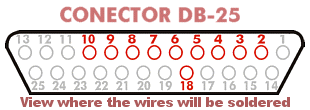
We have already done the most difficult part. All that's left now is making the connections to the DB-25 connector and to make the connections with the female connector on the N64 controller. To the right, we have the image of the connector with the pins that we are going to solder in red.
Connecting the controller to the circuit
In order to connect the N64 controller to the circuit we have two options: a clean, but expensive method, and a less clean but free method.
The cleanest method is to buy an extension cable for the N64 controller ($8 at Wal-Mart), cut the cable and wire it directly to the points of the circuit. It is advisable, before soldering, to verify with a meter which color wire goes to what holes of the female connector. Then solder the wires to the circuit on the spots marked
,
&
.
Less clean (more dirty ;-) it is to connect three cables to the points
,
&
and to strip enough insulation from the wires and push them directly in the holes of the female connector on the N64 controller.
While this may seem cheesy, I can assure to you that it holds well enough. He is known to do this whenever we move controllers from the console to the PC, but if you don't want to spend the money for the extension, this is the only option (other than hacking a connector off a controller and hard-wiring it).
We arrived at the final part of electronic assembly. Before connecting the DB25 connector to the parallel port (printer port), we will verify all the connections, especially the 4006 IC connections and that the transistor is placed in the correct position. It is very important since if they are wired wrong, the components are liable to 'let their smoke out'. Warned you are;-D
The next step is to install the driver software for the controller.
SOFTWARE
Decompress DirectPad in a directory somwhere, i.e., C:\DPAD. Once you have connected the pad and and DB-25 connector to the parallel port, go to the Control Panel and double click Game Controllers. In this window, click the Add button, then click Add Other. Next, click Have Disk, then Browse, and navigate to the directory where you decompressed DirectPad and click OK. The controller will be recognized and you have to click OK. Click Finish to allow Windows to install the new driver. It then takes you back to the Add Game Controller dialog. Now, scroll down and select DirectPad Pro Controller and click OK. Back to the main Game Controllers screen, select DirectPad Pro and click Properties, then scroll down to the four types of N64 controllers.
Your N64 controller will work with any of the four configurations (the options are: N64 4-axis, N64 Analog, N64 Digital or N64 POV), and depending on the option you will have directional control via the analog control (small joystick) or digital (the cross). Your choice will, of course, depend on the type of game you are going to play. You can always add another DirectPad Pro controller to Game Controllers, so you have a simple way to have several configurations simultaneously.
EXTRA
To connect a second pad to the same parallel port
Thanks to Stephen Hans (Father of this invention), and to Earle of DirectPad 5.0, it is now possible to connect two N64 controllers to one parallel port. For it, you will have to make another circuit assembly identical to the original. You will also need these additional components:
List of components to make the adapter for 2 pads:
COMPONENT 1
DRAWING
1 diode 1N4148 D1
COMPONENT 2
DRAWING
1 male DB-25 connector with cover
COMPONENT 3
DRAWING
2 female DB-25 connectors with covers
COMPONENT 4
DRAWING
1 meter of wire with 5 conductors
Now, on to the drawings:
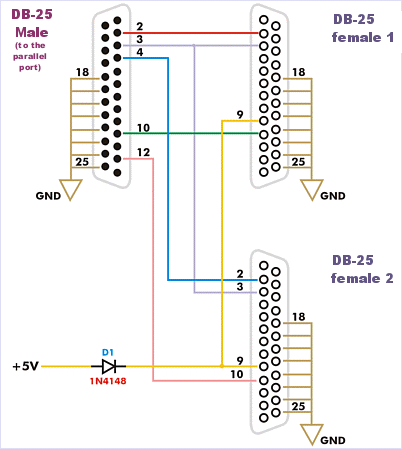
Schematic to make the adapter
to put 2 N64 pads on a single parallel portRemember that you must connect all the grounds (GND) to each other, as well as connecting those to the negative side of your 5V.
You can get the necessary 5 V from many places, (gameport-pin 1, keyboard connector-pin 5, PS/2 connector-pin 4 or from a power supply connector inside the PC) but, if you are inexperienced, it may be best just just buy a 4.5V or 5V power supply and use that!
There you go! As you can see, this adapter cable is relatively simple. In order for both controllers to work, you must have DirectPad Pro version 5. You must install 2 copies of DirectPad in Control Panel/Game Controllers and assign each a different ID.
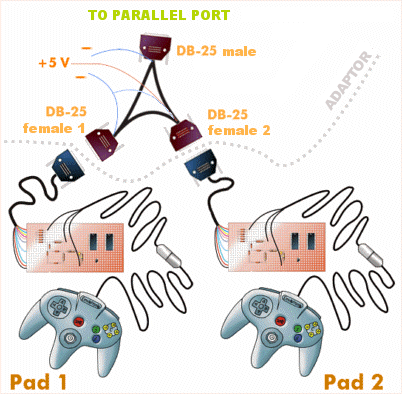
In conclusion, the entire setup with both pads, circuits and adapter cable would look like this:
If you want to use both pads in UltraHLE, you will need the latest version of UltraHLP.
I hope that this webpage has been useful to you. I assure that it works, at the moment, it is in use on my PC (I simultaneously have a PlayStation pad and a Nintendo 64 pad connected to two parallel ports). If you do not want to use the parallel port your printer is plugged into, you can always buy a small controller board with 2 serial ports and 1 parallel port, I believe that they are cheap and then you won't have to plug and re-plug constantly. Another option is to buy a switchbox.


