|
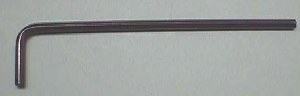
This seems to be an area that many newbie & old hands alike run into troubles with :-( The very first thing you should know about adjusting width coils is to NEVER adjust them with a metal Allen wrench! It seems that everyone, even people that don't own a hammer, have an Allen wrench at their disposal. Take a look at the pic below of an Allen wrench because even a person that told me he didn't know what it was, after looking at the pic said, "Oh yeah, I 've got those!"
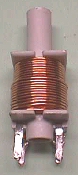
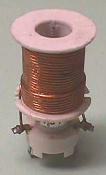
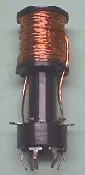
 There is more than one reason not to use this beast. The first is that the ferrite core that you are trying to adjust will not stand up to this.... it will crack rendering it useless since you can no longer move it through the field. Ferrite is a composite chemical compound of iron oxides & other metalic oxides that can be rapidly magnetized & demagnetized.... made from powder, so to speak... so it is not strong enough to stand up to the torque of an Allen wrench. Add to this mix the fact that the cinching material.... rubber band-like piece that secures the core to the coil form's inner wall.... has melded the core to the coil form making it virtually impossible to move, and you have a core that has no choice but to crack, break & even crumble! The second thing would be the ease in which you can get a shock trying to manipulate this metal conductor around the chassis' many hot spots. If you are uncomfortable in working with even plastic alignment tools around a live chassis, I would suggest adjusting the core a little at a time while it is off & then firing it up to see your results. I've seen first hand that getting a shock is not always what does the most damage, it's what you do after being shocked! Some will instinctively throw their arms about breaking other things, cutting themselves, while others will jump & run around in circles yelling & screaming.... well... you just never know how you will react to getting a shock and there's no sense in tempting fate to find out :-() So you're a tough guy & a little shock is not going to bother you.... well, you will still encounter yet a third disparagement that will certainly keep you from doing this, at least while the chassis is live, and that is that the Allen wrench will heat up enough to burn your fingers... badly :-( The correct way to adjust the width coil is with a plastic alignment tool. If you adjust while live & viewing your results directly, always be aware of the surroundings & don't lose your concentration to where you allow your hand or arm to brush any of the exposed hot spots for one of those shocking experiences :-( 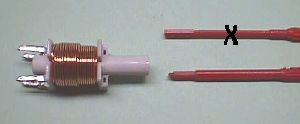 At the onset of adjusting any coil, new or used, you would test the ferrite core to see if it is frozen with the end of the tool that has a shaft of a smaller diameter than the actual hex end as indicated in the pic above with the "X". This end is more flexible & will give, twisting a bit, as you try to turn it. Try both ways in a rocking motion. If your ferrite doesn't want to move at this point then there is no magic potion to free it, that I am aware of, so it's going to take careful coaxing from this point on. If it's a used coil you are trying to adjust you would now swap over to the end that has a larger diameter than the hex end... beefier for more torque, but you still cannot force it as it will break the same as if you were using an Allen wrench.... it just takes a little more pressure. You want to apply a moderate pressure in one direction followed by an equal pressure in the opposing direction while the coil form is cold... having set for at least 15 minutes with no power applied. Not getting it yet? Try running the chassis for an hour heating up the coil & then repeat the previous process. It takes patience & maybe several cycles of this torture, but they usually free up to useability, lasting for years to come. If it's a new coil stuck from newness, rather than melding, the key to freeing it up successfully is somewhat the same as with the used ones, but the ferrite core on a new one is fed in through the bottom during mfr'g & generally stops even with the top portion of the actual coil. In most cases, this works out to a no-need-to-adjust position, but when it is necessary to adjust while new & not wait till the expanding & contracting of use make it sloppy in the coil form, you need to inch it downward toward the direction of it's original insertion. Much like a screw that you have only screwed into a piece of wood halfway, it is much easier to back out than it is to thread it in further. You are actually backtracking down the threaded portion of the coil form, & generally, you never need to raise the core up into the hollow top portion of the coil form, if your coil has one... some don't. If you have a well broken in coil that travels the entire length of the form, you can see that as the ferrite core moves through the form you will have 2 distinct full ranges of adjustment distance.... as it enters the coil's field from the bottom & as it exits from the top... so there is nothing to be gained by moving up into the top of the coil form & this is usually where they are broken by plastic tools. I imagine the thought behind this is that you will somehow gain width by adjusting into the top of the form, but that is not the case. Turn your core in a clockwise manner & if you encounter any resistance, then you can back it off a bit & try again... rocking it back and forth to gain ground.
Don't beat up your coil for no good reason. If it doesn't have the travel you think you need, make sure first as it could be that it is already at it's max position & you have circuit troubles rather than an adjustment problem. A common incidence of this would be in a G07 chassis that you have recapped & installed a new width coil, but failed to adjust the B+ voltage up to 120 VDC causing a lack of width in the pic that no coil will ever regain for you. If your pic is shrunken from the sides it is easy to see your results as you move the ferrite through the coil form & when you see that you are at a point where the pic starts to ebb in either direction, you are at max width & need to look at other circuitry as the cause of shrink. If your pic is wider than the screen, then pick a spot that contours an object on the screen, or cross hatch, if you have the luxury of a generator or PCB test pattern, and place a piece of electrical tape on it for a reference point to judge your travel on. Once you see that you have reached a point where either direction of turning nets you the same results... you've reached the minimum range of width & it's time to look at other circuitry as the culprit for your dilemma... perhaps the B+ being too high. Tip: When replacing old worn out coils you should save the ferrite cores as they will come in handy if you ever break one in a good healthy coil form. If this occasion arises, use a hand drill with a small bit to drill the center of the broken ferrite core that needs to be removed. It'll come out in pieces & after cleaning the residue you'll be ready to give it new life with your previously saved core. Hopefully, this is enough info to keep you from burning yourself, getting shocked or maybe saving the lives of many coils..... Happy Gaming.....
PostScript:
Here's another FAQ in one form or another:
How do I keep from getting a shock on the chassis' that have the width coil in a tight place next to the flyback transformer?
Here are 2 ways to handle that.
Take an ordinary plastic drinking straw & insert your width coil adjusting tool into one end & tape it in place.
You can stiffen up the turning end by taping in an unused adjusting tool.... or any piece of plastic or wood that will fit. Actually, although I've never tried it, you could probably fill it with hot glue or an epoxy to make it a permanent tool.
Mark the face of your screen at the outer edges of the pic with a piece of masking tape to show your current width & then power down. Pick a direction... clockwise or counter... and then adjust the coil 1/4 turn, power up & note the difference. If your pic is narrower, power down & change direction going back a 1/2 turn to compensate for your wrong move. Power up & see if you've gained enough width, and if not, do the same procedure a 1/4 turn at a time in the same direction until you've achieved your goal without the possibility of shocking results.
|