Way back in 1998 lots of newbies to the video arcade collecting hobby were still getting minor shocks from discharging CRTs (picture tubes), and moreover, were simply stating that they were scared to death to go near the monitor, or particularly afraid of the high voltage anode lead & the discharging of it to remove the chassis. In fact, some reported some horror stories of their attempts to simply wind a piece of wire around a screwdriver and discharge a monitor as written up here in *netland* someplace. This may be alright for an experienced person to do... although I would never do anything like it or recommend it to anyone... but a newbie most times has no knowledge of electricity [or very little] and sometimes does not follow the instructions as closely as needed to perform a discharge in this manner safely.
I finally came to the conclusion that newbies were going to persist in trying to discharge a CRT in this manner even after being bitten once... and even twice or more in some cases... ( Mr Macho - I can take it!)so I decided to do something about it before someone was really hurt, or worse, residing in a new home much earlier than anticipated :(
Enter the SafeBack, a safe way to use the method of discharge they had become accustomed to, regardless of the number of shock treatments they had received :) Of course, lots of them are seasoned pros now, helping other newbies to the group & old hands, as well. Anyway, this is another of those items that cost much more to make than I charge for them, and they take away time from the thousand other projects, so I've quit making & selling them, but as I did the last one I took pics of it step by step & will document everything here so that you can make your own.
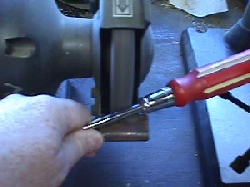
You can get all the parts you need from your local auto parts store. You'll need a good size screwdriver, about 4' of 16 gauge wire (you could use an ordinary household extension cord cutting off the connector & twisting the wires together since they are so inexpensive & readily available), a spade connector and a battery terminal clamp.

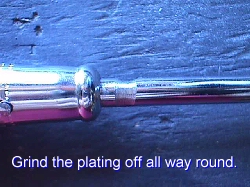
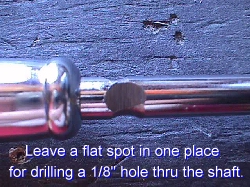
Well... I started off with a 12" screwdriver as pic'd above and the first step was to grind off the plating up close to the handle as pic'd, ending with a flat spot in one area in order to be able to drill a 1/8" hole thru the shaft.
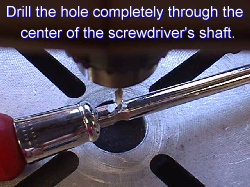
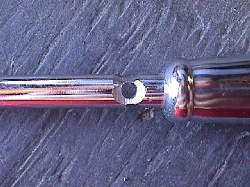
Hmmm... the pics are pretty much a step by step all by themselves :) Don't you just love digital cams :) Anyway, after doing all the grinding & drilling above, you can tin the blade where the grinder was used if you have a soldering gun, but if all you have is a soldering iron you can bypass that step.
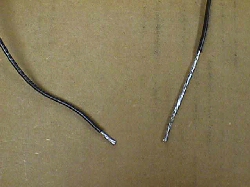
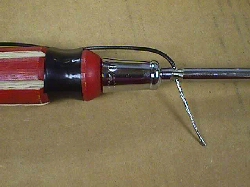
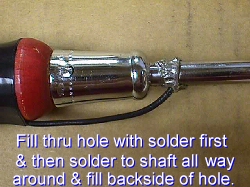
Next cut your 16 ga wire to 40 to 44 inches long and strip back the insulation on one end exposing 2" of wire, and on the other end you need to strip back about 3/8" of the insulation. Tin both ends of the wire & then feed the 2" end through the hole in the blade up to the insulation & tape it to the handle as pic'd to hold it in place. Wrap the wire completely around the shaft forming a ring. Since it is tinned, you can use pliers to bend it to a snug fit all the way around.
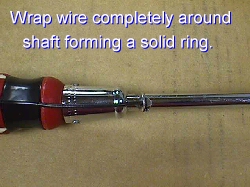
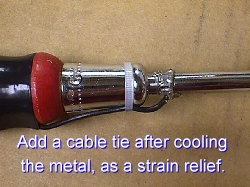
Now you can start soldering it in place by first filling in the thru-hole with solder & then continuing all the way around the blade and filling the other end of the hole, as well. After all the metal cools down, you can put a cable tie out near the end of the handle to act as a strain relief & insuring that the wire does not come loose in any way.
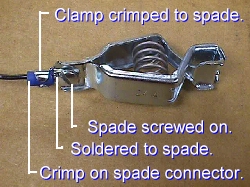
Now for the clamp end pic'd below. Start with crimping a spade onto the end of the wire with enough wire sticking through so that you can solder it to the spade, also. Once this is done you can fasten it to the screw on the spring loaded battery terminal clamp and crimp it to the spade terminal.
You're ready to go now and you can discharge from a safe distance without the worries of something falling off... everything is rock solid now. Just put the clamp anywhere on the metal framework as it is all tied to ground once a CRT is mounted. The grounding dag that goes across the belly of the CRT actually ties to the framework. Next just slip the blade up under the anode cup to ground out the *big capacitor*, so to speak, taking all the zap out of it. There is often a residual mystery charge left in the CRT, and a second, or even third, discharge after waiting a minute or two may give you a better peace of mind. Discharge upon reconnecting the anode wire, also. On some monitors you will hear the snap of discharge, but many monitors have built in bleeders to discharge automatically at shut down and will not make any noise. ALWAYS discharge even if you know a particular brand has bleeders because there is always a possibility that the circuit has opened leaving a huge surprise for the uncautious.
Now for a couple of often asked Qs that spawn from college text books.
Aren't you suppose to put a resistor in series with the ground line to bleed off the high voltage slowly?
I was schooled the same way a hundred years ago... put a bleeder resistor in the line to discharge the HV quietly & slowly... but I have not seen this in the real world, although surely some techs do, but in all the shops I've ever been in from Seabrook, NH to Gallatin, TN to Jackson, MS and out west as far as Fresno, CA, I just have not seen any techs that practice this. I asked one of the leading mfr's tech reps if they used bleeders in discharging in their shop & he said something to the effect of... you've got to be kidding... and that left a lasting impression with me.
With newbies & other collectors that have perhaps been working on their monitors for years & years, I personally would feel better with them hearing that snap of discharge that gives them a sense of security in knowing that they can proceed safely without getting the nervous shakes around HV circuits :(
Doesn't this damage the CRT if bleeders are not used?
IMHO this does not damage the CRT in any way. I have test jig CRTs for the various common place monitors that were used to work on op's chassis' that
are 20+ years old & have been discharged certainly thousands of times, and more likely over ten thousand times, and show no signs of damage... in fact, my K4600's CRT looks as good as the day I bought it... pristine.
Happy Gaming...........
Help Page Index Big Bear's Bulletin Board Site Index